TIP
NoteToMP插件从1.2.0版本开始,使用仓库内笔记作为自定义CSS文件,弃用了之前的
custom.css。使用笔记更方便管理样式,直接在Obsidian内即可调整更新。
TIP
NoteToMP插件从2.10版本开始,支持使用less语法,并且新增了自定义主题,启用自定义主题后,将完全使用用户自定义的样式,不再受默认样式影响,用户可以完全控制文章的样式。
新建一篇笔记,例如自定义样式,直接将如下内容粘贴进笔记:
``` less
.note-to-mp {
    font-family: Optima, Optima-regular, "Microsoft YaHei", PingFangSC-regular, serif;
    padding: 0;
    background-color: #FFFFFF;
}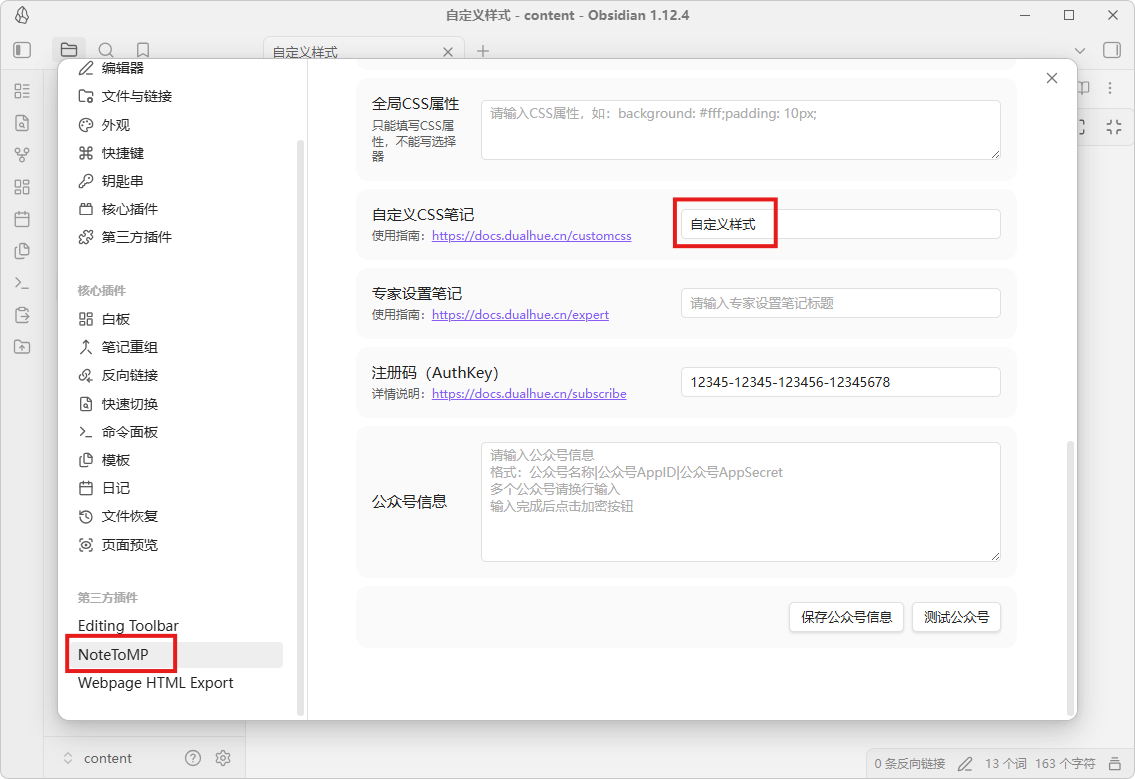
```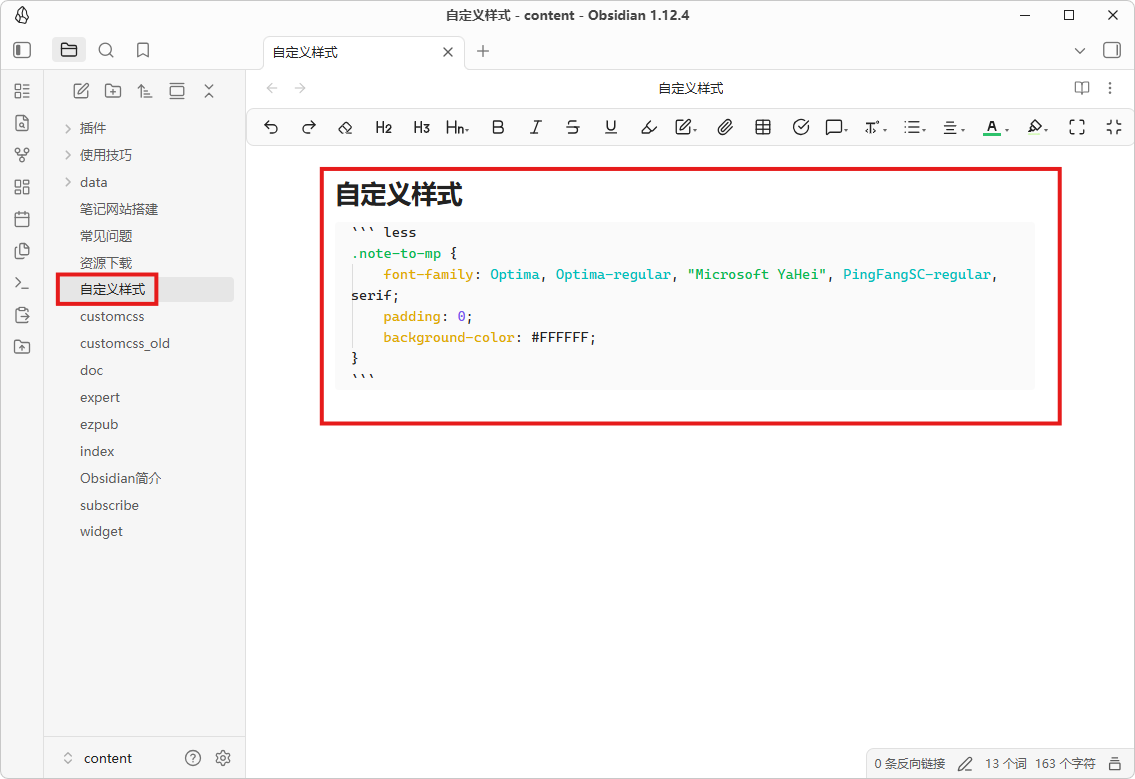 然后打开NoteToMP插件设置,将自定义样式(即包含自定义CSS内容的笔记名称),粘贴到自定义CSS笔记中即可。如果不使用自定义CSS,留空即可。
CSS类名
请更新插件
请将插件更新至2.1.0,以下内容为Less语法,如果不熟悉Less语法也可使用CSS语法
关于自定义文章样式的写法可以参考下面的Less代码:
.note-to-mp {
    // 全局属性
	// 这里可以设置字体,字体大小,边距,背景颜色等
	font-size: 14px;

	// 段落
	p {
	    // 注:请在大括号内改写!!!
	}

	// 一级标题
	h1 {
	    // 注:请在大括号内改写!!!
	}

	// 二级标题
	h2 {
	    // 注:请在大括号内改写!!!
	}

	// 三级标题
	h3 {
	    // 注:请在大括号内改写!!!
	}

	// 无序列表整体样式
	// list-style-type: square|circle|disc;
	ul {
	    // 注:请在大括号内改写!!!
	}

	// 加粗
	strong {
	    // 注:请在大括号内改写!!!
	}

	// 斜体
	em {
	    // 注:请在大括号内改写!!!
	}

	// 加粗斜体
	em strong {
	    // 注:请在大括号内改写!!!
	}

	// 删除线
	del {
	    // 注:请在大括号内改写!!!
	}

	// 分隔线
	hr {
	    // 注:请在大括号内改写!!!
	}
	// 图片
	img {
	    // 注:请在大括号内改写!!!
	}

	// 表格
	table {
	    // 注:请在大括号内改写!!!
	}

	// 表格中的单元格
	th, td {
	    // 注:请在大括号内改写!!!
	}

	// 文件嵌入引用
	.note-embed-file {
		// 注:请在大括号内改写!!!
	}
	// 高亮颜色
	.note-highlight {
	  // background-color: rgba(255,208,0, 0.4);
	}

	 // Callout
	 // 可以调整各种类型Callout的文字颜色和背景颜色
	 // color: rgb(158, 158, 158);
	 // background-color: rgba(158, 158, 158, 0.1);
	.note-callout-note {
	}
	// abstract tip hint */
	.note-callout-abstract {
	}
	.note-callout-success {
	}
	// question  help, faq, warning, caution, attention
	.note-callout-question {
	}
	// failure, fail, missing, danger, error, bug
	.note-callout-failure {
	}
	.note-callout-example {
	}
	.note-callout-quote {
	}
}
样式示例
例如这篇文章几个让公众号排版更精致的小技巧,手机上也可以!👈️使用的自定义样式如下:
.note-to-mp {
    font-family: Optima-regular, Optima, "Microsoft YaHei", PingFangSC-regular, serif;

	h2 strong {
	    display: inline-block;
	    background: rgb(90, 185, 131);
	    color: rgb(255, 255, 255);
	    padding: 2px 16px;
	    border-top-right-radius: 3px;
	    border-top-left-radius: 3px;
	    margin-right: 10px;
	    visibility: visible;
	}

	h2 {
	  border-bottom: rgb(90, 185, 131) 2px solid;
	  color: rgb(90, 185, 131);
	}

	section .note-callout-example {
	    color: rgb(90, 185, 131);
	    background-color: rgba(90, 185, 131, 0.1);
	}
}上面的例子,通过.note-to-mp指定了文章的字体,通过h2 strong单独定义了h2标题下strong的样式,这样可以在标题中通过使用粗体增加了一个边框样式。通过h2定义了h2标题的底部线条的宽度和文本颜色。这样配合Olive Dunk主题就形成了自己的风格。
设置标题、加粗、分割线颜色
一般来说我们可以通过简单的设置标题、加粗、分割线颜色等的颜色来制作自己的样式,如下所示:
```less
@primary-color: #33357D;
.note-to-mp {
	h1, h2, h3, h4, h5, h6 {
	    color: @primary-color;
	}
	strong, em {
	    color: @primary-color;
	}
	.note-to-mp hr {
	    border-top: 1px solid @primary-color;
	}
}
```上面的自定义CSS,将标题、加粗、分割线颜色设置为#33357D,你可以将其改为自己喜欢的颜色。
设置列表的编号、标记颜色
``` less
@list-mark-color: #3370ff; // 编号、标记颜色
@list-text-color: #1f2329; // 列表文字颜色
.note-to-mp {
	ul > li {
	  color: @list-mark-color;
	}
	ul > li::marker {
	  color: @list-mark-color;
	}
	ul > li > section {
	  color: @list-text-color;
	}
}
```
标题居中
``` less
.note-to-mp {
	h1, h2, h3, h4 {
	    text-align: center;
	}
}
```
图片居中
``` less
.note-to-mp {
	img {
	    display: block;
	    margin: 0 auto;
	}
}
```
创建自己的主题
在以往的版本中,自定义样式都是在已有主题基础上修改,如果从零开始打造自己的主题就需要考虑覆盖选定的主题样式。在2.1.0中新增了一个名为自定义的空白主题,用户可以在插件设置中将自定义设置为默认主题后,然后在自定义样式中实现完整的主题。
如果您想要从零开始打造自己的主题,请基于下面的主题修改:
警告
请不要修改代码块部分内容!!! 由于代码块部分结构复杂,除非你已完全理解否则不要修改!!!
``` less
// 字体
@font-family: Optima, Optima-regular, "Microsoft YaHei", PingFangSC-regular, serif;
@title-font-family: @font-family;
@code-font-family: Menlo-Regular, Menlo, Monaco, Consolas, 'Courier New', monospace;

// 字体大小
@font-size: 16px;
@line-height: 1.6em;
@h1-font-size: 1.5em;
@h2-font-size: 1.3em;
@h3-font-size: 1.1em;
@h4-font-size: 1em;
@h5-font-size: 1em;
@h6-font-size: 1em;
@table-font-size: 1em;

// 字体粗细
@title-font-weight: 600;
@bold-font-weight: bold;
@italic-font-style: italic;
@h1-font-weight: bold;
@h2-font-weight: bold;
@h3-font-weight: bold;
@h4-font-weight: bold;
@h5-font-weight: bold;
@h6-font-weight: bold;

// 容器间距
@md-body-mg-h: 0;
@md-body-mg-v: 0;
@md-body-pd-h: 0;
@md-body-pd-v: 0;

// 间距
@block-mg-v: 0.75em;
@blockquote-mg-h: 0;
@li-mg-t: .25em;

// 颜色
@primary-color: #353535;
@font-color: #222222;
@del-font-color: #525252;
@head-color: #262626;
@link-color: #2478c5;
@code-font-color: #424242;

@body-bg-color: white;
@mark-bg-color: #fcffc0;
@code-bg-color: white;

@border-color: #bfbfbf;

// 链接,分割线
@link-decoration: none;
@hr-bd-style: inset;
@hr-bd-width: 1px;

// 表格
@table-border-spacing: 2px;
@table-font-color: @code-font-color;
@table-bg-color: @code-bg-color;

// 代码块
@code-line-height: 26px;
@code-section-padding: 0.5em;
@code-section-pre-padding-left: 1em;

.note-to-mp {
  font-size: @font-size;
  color: @font-color;
  background-color: @body-bg-color;
  line-height: @line-height;
  margin: @md-body-mg-v @md-body-mg-h;
  padding: @md-body-pd-v @md-body-pd-h;

  // 边距
  p, pre, blockquote, table, figure {
    margin: @block-mg-v 0 (@block-mg-v * 0.6); // Less 计算建议加括号
  }

  hr {
    margin: @block-mg-v auto;
  }

  // 标题
  h1, h2, h3, h4, h5, h6 {
    margin-top: 2 * @block-mg-v;
    margin-bottom: @block-mg-v;
    margin-left: 0;
    margin-right: 0;
    font-weight: @title-font-weight;
    line-height: 1.5em;
    color: @head-color;
  }

  h1 { font-size: @h1-font-size; }
  h2 { font-size: @h2-font-size; }
  h3 { font-size: @h3-font-size; }
  h4 { font-size: @h4-font-size; }
  h5 { font-size: @h5-font-size; }
  h6 { font-size: @h6-font-size; }

  // 分割线
  hr {
    height: 1px;
    border: 0;
    background-color: @border-color;
    border-style: @hr-bd-style;
    border-width: @hr-bd-width;
  }

  // 段落
  p {
    margin-left: 0;
    margin-right: 0;
  }

  pre {
    padding: 0;
    border: 0;
  }

  // 引用
  blockquote {
    display: block;
    padding-left: 0.8em;
    border-left: 0.2em solid @primary-color;
    color: @font-color;

    &:first-child {
      margin-top: 0;
    }

    &:last-child {
      margin-bottom: 0;
    }
  }

  // 列表
  li {
    word-wrap: break-all;
  }

  ul {
    margin-left: 1.3em;
    padding: 0;
  }

  li::marker {
    color: @primary-color;
  }

  li > p {
    margin: 0;
  }

  ol {
    padding-left: 1.3em;
    list-style-type: decimal;
  }

  // 图片
  img {
    max-width: 100%;
    height: auto;
  }

  u {
    text-decoration: none;
    background-image: linear-gradient(to bottom, rgba(0, 0, 0, 0) 50%, @primary-color 50%);
    background-repeat: repeat-x;
    background-size: 2px 2px;
    background-position: 0 1em;
  }

  a {
    color: @link-color;
    text-decoration: @link-decoration;

    img {
      border: none;
    }
  }

  b, strong {
    font-weight: @bold-font-weight;
  }

  i, em {
    font-style: @italic-font-style;
  }

  del, s {
    color: @del-font-color;
  }

  pre, code {
    font-family: @code-font-family;
  }

  mark {
    color: inherit;
    display: inline;
    padding: 0.2em 0.5em;
    background-color: @mark-bg-color;
  }

  // 图片标题
  figcaption {
    text-align: center;
  }

  // 表格
  table {
    color: @table-font-color;
    border-collapse: collapse;
    background-color: @table-bg-color;
    border-spacing: @table-border-spacing;
    font-size: @table-font-size;
    border: 1px;
    border-spacing: 0;
  }

  th, td {
    padding: 0.7em 1em;
    border: 1px solid @border-color;
  }

  caption, th, td {
    text-align: left;
    font-weight: normal;
    vertical-align: middle;
  }

  // 脚注
  .footnotes > ol li {
    text-indent: 0;
  }

  .footnotes hr {
    margin-top: 4em;
    margin-bottom: 0.5em;
  }

  // inline代码
  code {
    display: inline;
    color: @code-font-color;
  }

  // 代码块
  .code-section {
    display: flex;
    border: solid 1px @border-color;
    margin: @block-mg-v 0;
    line-height: @code-line-height;
    padding: @code-section-padding;
    font-family: @code-font-family;

    pre {
      margin: 0;
      margin-block-start: 0;
      margin-block-end: 0;
      white-space: normal;
      overflow-x: auto;
      padding: 0 0 0 @code-section-pre-padding-left;
    }

    code {
      display: flex;
      text-wrap: nowrap;
      font-family: @code-font-family;
    }

    ul {
      margin: 0;
      padding: 0;
      margin-block-start: 0;
      margin-block-end: 0;
      width: fit-content;
      flex-shrink: 0;
      height: 100%;
      line-height: @code-line-height;
      list-style-type: none;

      > li {
        text-align: right;
      }
    }
  }
}
```